
Migrating between ecommerce platforms can be daunting. For one, you’ll need to gather all your store data and assets and integrate them onto the new platform.
Another hurdle is that your team must get accustomed to the new platform.
However, after successfully migrating from Squarespace to Shopify, you’ll find more advanced features that can help your online business scale beyond a personal hobby.
What is Shopify?

Source: Maguire Shoes
Shopify is a lot like Squarespace—they’re both all-in-one ecommerce solutions for aspiring online entrepreneurs, providing hosting, web design, web analytics, domains, and store management, among many others.
However, Shopify provides a more advanced, robust, and somewhat more technical and overwhelming solution for ecommerce business owners.
For one, Shopify has an app store where developers can publish third-party apps that Shopify users can integrate into their store for some added functionality. These apps elevate Shopify users’ store management beyond Shopify’s default tools.
Furthermore, Shopify is tailored for international selling, allowing users to set up markets (e.g., Asia, Europe, America, user-defined countries, etc.) and edit the contents and layout of the website depending on where it’s being accessed.
How to Migrate from Squarespace to Shopify
There are quite a few things you’ll need to migrate from Squarespace to Shopify before you can properly run your business on the latter’s platform.
These include your products, customer data, domain, files, assets, and your website.
We’ll walk you through how you can migrate each of these, successfully transferring your business to the Shopify platform.
Step#1: Sign Up for Your Free Shopify Trial

Source: Shopify
First, you'll need a Shopify account.
Aspiring Shopify merchants can use Shopify for free for three days.
Then, after the three free days, they’ll need to choose a Shopify plan. Here, they’ll get their first month for only $1. This dollar month applies to the Starter, Retail, Basic, Shopify, and Advanced plans.
During this period, make sure to familiarize yourself with the platform and get your data migrated as soon as possible.
The quicker you can get your store set up, the sooner you’ll be selling.
Step#2: Migrate Your Files and Assets
Let’s start by migrating your media assets and other files.

Go to your Squarespace main dashboard.

Navigate to Website > Assets.
Important note:It’s not possible to download all images from your Squarespace in bulk. You’ll have to do this one at a time.

Click on the three dots on the upper-right of each image, click file details, and the fuller image will appear on the screen.
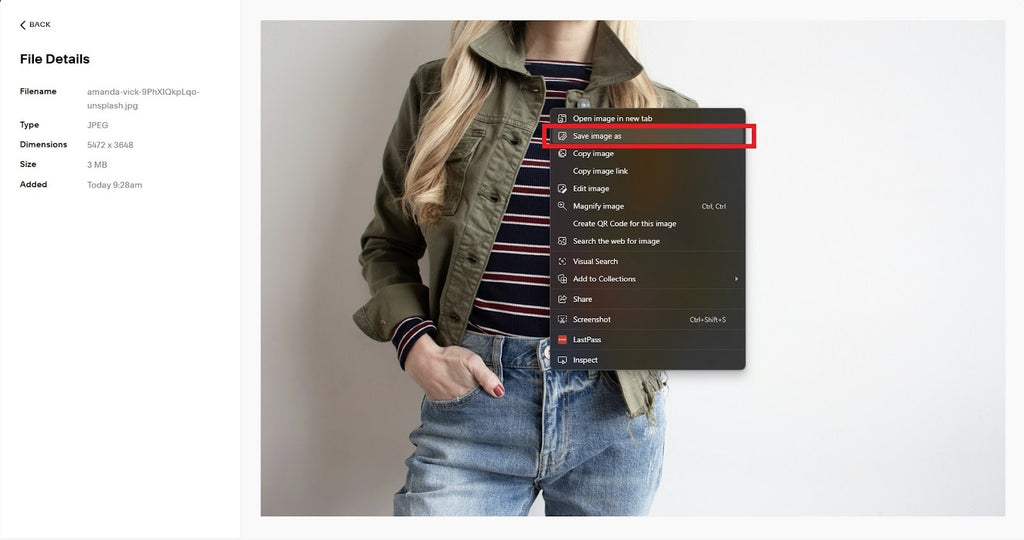
Right-click on this image and save it to your computer.
Now, this process may take a long time, especially if you have a lot of media assets.
Instead, we recommend having those images on the computer in the first place.
Coordinate with your web designer, graphic designer, or whoever has the Squarespace media, both for the site and the products, saved on their computer. Ask them for the files; in organized folders, preferably.

Once you have the files, go to your Shopify account.

Navigate to Content > Files.
Click on Upload Files.
To select multiple files, hold down Ctrl while selecting files. Alternatively, you may hold down Shift to select all files within two different photos that you select.
Then click Open.

Do this until all your Squarespace media is uploaded to your new Shopify business.
Step#3: Migrate Your Products
After migrating your media assets and other files, you may then migrate your products.

First, navigate to your Squarespace products. From the main dashboard, click on Selling > Products.

Click on Export All.

This will download all your products as a .csv file.
.csv files are spreadsheets of data that a program, such as Shopify, interprets and imports into its own database. With this in mind, .csv files are integral to the migration process, so look for opportunities to export them from Squarespace and import them to Shopify (e.g., customer data).

Then go to Shopify.

From the Shopify admin page, click on Products.

Select Import.

Drag your exported Squarespace products’ csv file to the box that appears.

Click Upload and preview.
Finalize by selecting Import products.
Give Shopify time to import your products. Depending on how many products you’re importing from Squarespace, this might take a while.

Great! You’ve now migrated the following information:
- Product Names
- Product Descriptions
- Prices
- SKUs
- Tags
Your new Shopify products should appear in Shopify’s product management section.
Go through each of them and add any necessary photos.
Do this by clicking on each product you’ve added. Then drag the product’s respective photos to the media box, displayed below:

If you’ve added the product’s image files to Shopify’s file management, you may instead click Select existing then select the product’s corresponding photo(s).
Step#4: Transferring Domain from Squarespace to Shopify
There are two ways to transfer your Squarespace domain to Shopify. But we’ll only discuss one of those ways, and that is to connect the domain.
This means Squarespace will still manage the domain but it will instead point to your soon-to-be-built Shopify store.
The domain will remain active even if you cancel your Squarespace site subscription—so long as you renew the domain subscription.

To connect a Squarespace domain to Shopify, go to your Squarespace account.

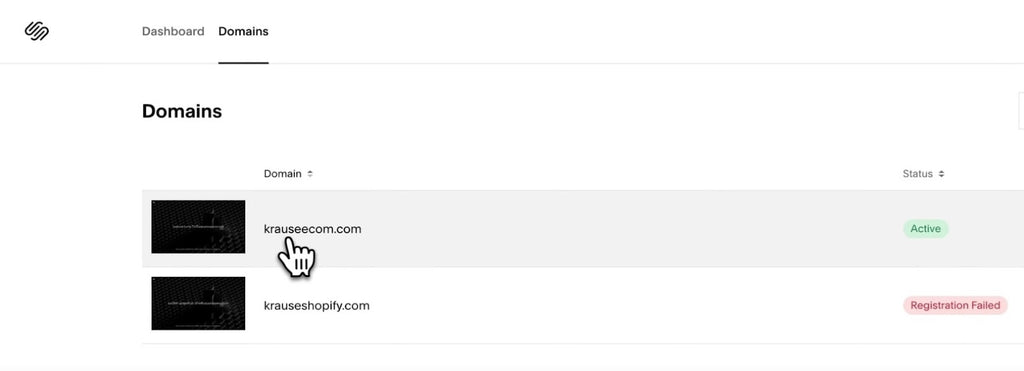
From the main Squarespace dashboard, click on Settings (gear icon) > Domains & Emails > Domains.
Source: How To Shopify
Click on the domain you want to transfer.
Select Manage Domain Settings.

Source: How To Shopify
Click Edit DNS on the top-right.

Source: How To Shopify
Delete the Squarespace default values. We’ll replace these values with those of Shopify’s.
Add the following values:
|
Host |
Type |
Data |
|
@ |
A |
23.227.38.65 |
|
@ |
AAAA |
2620:0127:f00f:e:: |
|
www |
CNAME |
shops.myshopify.com. |
Once these values and records are applied, go to your Shopify store admin panel.
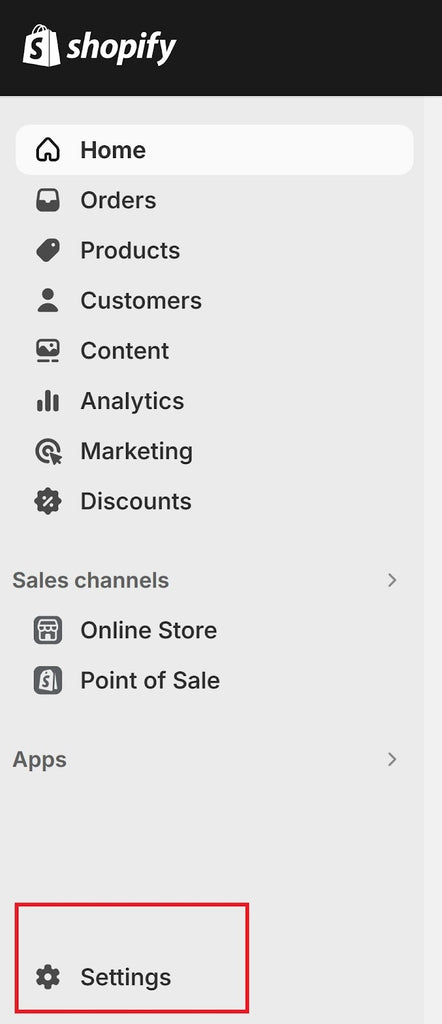
Navigate to Settings > Domains from the Shopify admin page.

Click Connect Existing Domain.

Paste your Squarespace domain in the Shopify field that shows. Click Next.

Click Verify Connection.
Your Squarespace domain will then be added to your Shopify list of domains.

Source: How To Shopify
Then click on the newly added domain.

Source: How To Shopify
Select Change domain type.

Source: How To Shopify
Tick the Primary domain radio box then finalize by clicking Change domain type.
At this point, whenever customers type your domain into their browser’s address bar, they’ll be taken to your new Shopify store instead of the Squarespace website.
Step#5: Transferring your Website from Squarespace to Shopify
Squarespace and Shopify are two completely different website editors on two completely different platforms. With no direct integration between the two ecommerce solutions, “migrating” your website’s look and functionality is a manual, ground-up process.
So, if you want a Shopify website that looks exactly like your Squarespace one and you don’t want to create a new, fresh website, you’ll need to start from square one.
Step#5.1: Choose a Theme

First, you’ll need to choose a Shopify theme.
Shopify themes are the starting templates for any Shopify store. They provide the design, functionality, features, and customization options that allow merchants to build robust ecommerce stores.
Note that you can’t determine whether or not you can replicate your Squarespace store just by glancing at a Shopify theme. You’ll need to give it a try before making that decision.

To do that, go to the Shopify theme store.
Look through the themes and click on one that might be useful to use.

Source: Blum theme
Then click on “Try Theme.” You may do this for both paid and free themes without paying a dime. This will download the theme to your theme library and explore the theme in depth.
Quick read: The Best Converting Shopify Themes for Your Online Store
Once you’ve downloaded the trial theme, go back to your Shopify theme library.

Navigate to Online Store > Themes from your main Shopify dashboard.

Then click Customize next to the theme you want to explore.
Step#5.2: Customize the Shopify Website
Unlike Squarespace, Shopify doesn’t have drag-and-drop functionality or in-editor page creation. So, some re-learning may be in order.
A lot of your customization options will depend on the theme you choose.

Once you click Customize from the previous instruction, you’ll be taken to the Shopify theme editor. This is where the website editing takes place.
Generally, what you need to know about the Shopify theme editor is:
- The editing process heavily relies on blocks and sections. These are the building elements for the page layout.
- The global style is located in theme settings. This is the gear icon on the left side of the theme editor.
- Clicking the “home page” dropdown shows you the different page templates you can edit.
- You’re editing page templates, not the pages themselves. Page templates are applied to pages to give them a particular layout.
We won’t go through the entire process of creating a website with Shopify.
Spending 15 minutes with the Shopify theme editor should give you a proper feel for the builder.
Step#5.3: Set Up Navigation and Pages
Once you’re done, head back to the Shopify main dashboard.
As mentioned earlier, you can’t create pages and navigation options from the Shopify theme editor. You’ll need to do that outside the builder.
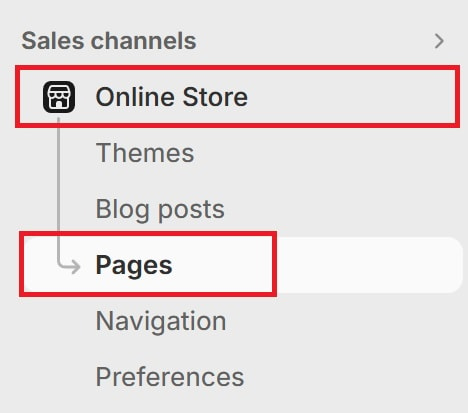
Navigate to Online Store > Pages.
Click Add Page.

Fill in the required details then click Save.
Pro tip: In this section, you may assign different templates to different pages. Create page templates in the Shopify theme editor. While in the theme editor, click on home page > pages > create template to create and edit a new page template.

Now that you’ve created a new page, go to Online Store > Navigation.

Select the main menu.

Click Add Menu Item.

Fill in the name of the menu item in the first field.
Then click on the field below it then select Pages > [Page You Just Created].
Click Add then Save Menu.
Repeat this process for every new page you wish to create.
The header of your Shopify website should now be updated with the corresponding navigation.
Get the help of a Shopify Partner
It can also be helpful to seek expert help for your Shopify migration if you want to migrate, for example, custom integrations, custom code, and APIs.

Shopify Partners are professional service providers adept at a wide array of solutions. To find one, go to the Shopify Partner Directory.

Search for “Store migration.”

You’ll see a list of store migration experts who can help migrate your Squarespace store to the Shopify platform. Take note of the “Plus partner” icons on the upper right. These are quality-assured experts who are vetted by Shopify, deeming them as higher-tier providers.

Click on the listing that looks best for you and look through the details.
Pay attention to the contact details. This is how you’ll reach out to the partner for Shopify migration.
Conclusion
The migration process from Squarespace to Shopify store can be overwhelming yet crucial knowledge to have. You'll need to import data, particularly your files, product data, domain, and website.
Doing so will take your existing Squarespace store and move it to an ecommerce platform with better scalability and more advanced features.
Your new Shopify store will take some getting used to, though. However, expanding your ecommerce expertise to the world of Shopify can open more business and growth opportunities.
Read more: An Easy Way to Customize Shopify Website (Step-by-step)

