Your Shopify website is one of the most crucial marketing aspects of your online store.
To customize Shopify website means auditing and improving one of your online marketing fronts for better business performance.
This guide will explore how you can do just that. No coding knowledge required.
Customize Shopify Store vs Shopify Website

Source: Blum theme
Before we go deeper into this guide, we’d like to clarify what we mean by “customizing the Shopify website.”
This means adjusting the various front-facing aspects of a Shopify-powered site. So, things like the layout, color, typography, images and videos, and the copy.
We'd like to categorize business areas such as setting up payments, shipping, and adding and managing products as “store customization.” And hence, we won’t discuss those in this guide.
With SalesHunterThemes deep expertise in Shopify theme design and development, we’re also focusing this guide on items that can be edited in the Shopify theme editor.
Why should you customize your Shopify website?
There are a few reasons merchants would want to customize their Shopify website—all of which are tremendous drivers of brand loyalty and conversion.
Better Engagement
A properly designed website is easier on customers’ eyes than a clunky one with blocky paragraph chunks.
Also, depending on the stylistic and functional elements you’ve integrated (e.g., Shopify apps, theme customization, etc.), the Shopify website can engage better with visitors and customers alike.
Improved Brand Message Delivery
Merchants can improve their brand message delivery by optimizing the website’s design.
A visually functional website can communicate multiple value propositions without overloading users with information.
Reinforced Brand Identity
A website is one of a business’s most crucial online marketing assets.
Matching a website’s design and feel to that of the brand reinforces the brand identity. This results in better memory retention among visitors and improved authority and credibility.
How to Customize Shopify Website (Step-by-step)
A little summary: you'll need to understand Shopify themes and grasp Shopify theme customization if you want to tweak your store pages.
This step-by-step will gently walk you through the store design process.
Step#1: Lay out your website

Source: Miro
Before you touch anything, you’d want to have a concrete idea of how you’d like the Shopify website to look first.
You may draft this up on a piece of paper or use more elaborate photo editing or layout software to mock one up.
This is known as creating a website wireframe—a (very) rough sketch of where images and text go on the website. It plots how they’re laid out before designing starts.
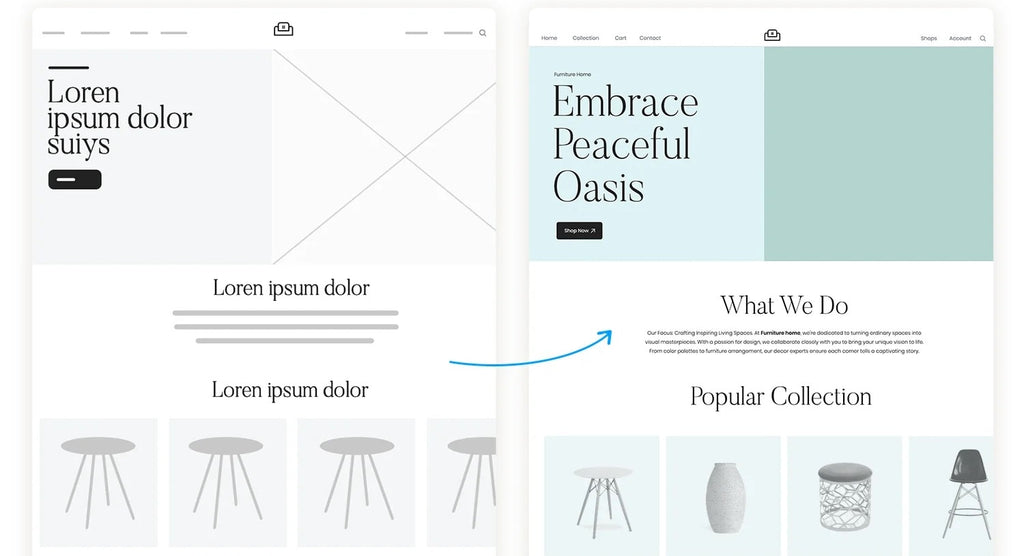
Source: Justinmind
After plotting the images, icons, and text, designers can begin choosing the colors, typography, and brand assets to use for the site, creating a more “final” look for the to-be-created Shopify store pages.
Designers may do this using creative software or in the Shopify theme editor itself.
Note: We highly suggest that you finalize the copy you’re going to use before design begins. Otherwise, you may use the good old “Lorem Ipsum” text placeholder.
Step#2: Choose a customizable theme
Once you have a concrete, finalized look in mind, your next goal is to replicate it in the Shopify theme editor.
But before that, you’ll need to choose a theme that can replicate that look.
It's even better if the theme you choose can also provide added functionality, animations, and other interactive elements that can spice up and add to the brand experience.

In this case, we use the Blum theme as a starter example. This theme is an easy-to-use and affordable theme suitable for small businesses.
So, make sure you select paid themes. These themes have more customization options and features than the free Shopify-made ones, such as the Dawn theme. Free themes are still great for starters, though.
Once you have a theme in mind, don’t buy it just yet. Try it out first and see if you can customize the theme to get close or exact to your final wireframe mockup. More on theme customization in the next section.
To do that, click on Try Theme on the theme’s respective Shopify theme store listing.

Then, from the theme library, click Customize next to the trial paid theme.
Only after you’ve found a winner do we suggest pulling out your wallet.
Quick read: What are the Best Shopify Themes for your Online Business?
Step#3: Customize the theme with the Shopify theme editor
Customizing a theme will bring merchants to the Shopify theme editor.
The Shopify theme editor is where all sorts of visual and functional customization happen to the Shopify website.
There’s a lot to explore when it comes to the Shopify theme editor, so we’ll focus on the most significant ones.
Pages
Upon opening the Shopify theme editor, you’ll immediately be editing the home page, which is a great page to edit first on your website.

But if you wish to work on a different page, click on the page dropdown at the top of the theme editor. This will be labeled according to the current page you’re working on, so in most cases, “Homepage.”
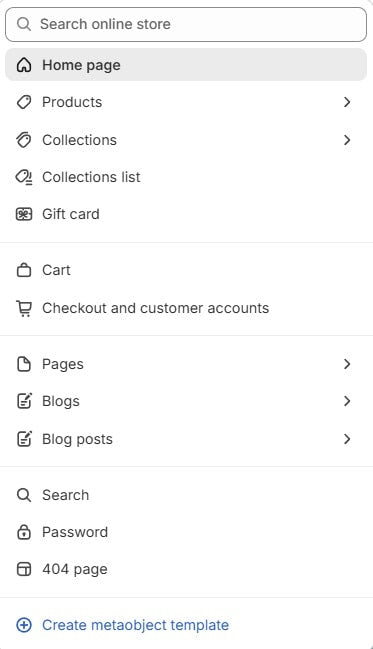
Select the page you want to edit from the dropdown.
Doing so will let you edit the selected page.

For the options with a right-pointing arrow, such as products and blogs, you can have multiple variations for page layouts and designs for each of them. For example, product A will get template A, and product B will get template B; the same goes for blogs, collections, and custom pages.

These different variations are called page templates. You may click + Create Template to generate and edit a new one.
After creating the new page templates, merchants then assign these to their respective products, blogs, collections, and pages outside of the Shopify theme editor. We won’t dive into that in this guide.
Main Parts of a Page

The main parts of a page can be divided into:
- Header Group
- Template (this functions as the page’s body)
- Footer Group
Adding sections and blocks to each of these parts will place these sections ONLY in these areas. A section added to the header can’t be dragged onto the template or footer group.
Also, depending on the theme, only certain sections and blocks may be placed in each of these areas. For example, the announcement bar is always a header group exclusive section.
Usually, the template group has the largest section selection.
For the Shine theme, the header group has a selection of three sections; the footer has nine sections; and the template group has 28 sections.
Always check the panel on the left and see if you’re working on the right part of the page. You wouldn’t want to be adding sections to the header if you meant to be working on the page’s body.
Sections and Blocks

Sections and blocks are the building elements of each page.
Each of them contains media slots, text areas, buttons, and other elements that serve a specific purpose.
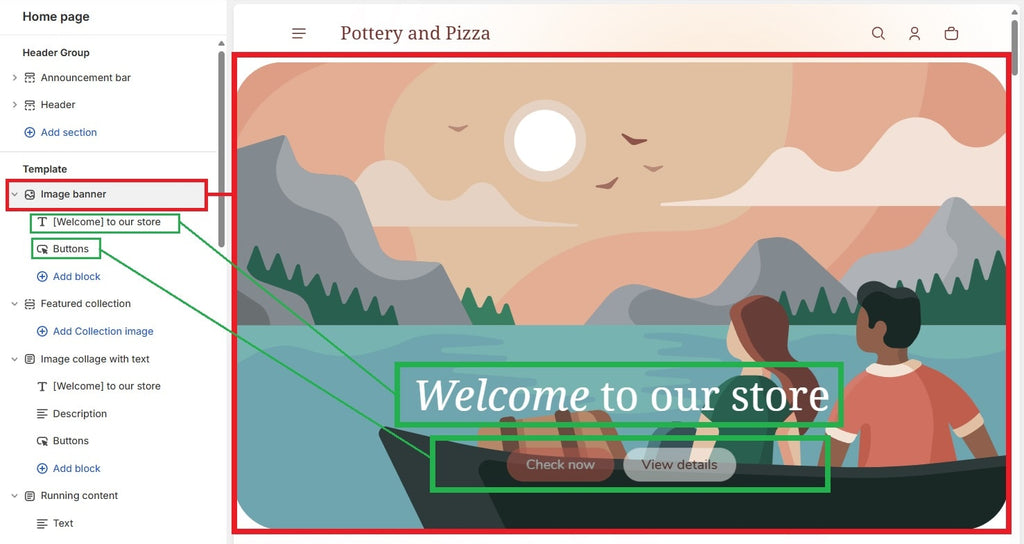
For example, a banner section prominently displays a headline message.
A newsletter section captures leads’ emails.
Note that different themes have different sets of sections to choose from. The more customizable themes will have more sections and blocks to play around with.

Shine has 28 sections to choose from.
These include a Before/After section, some prominent banners that include countdown timers, and “running content,” which is marquee text that scrolls horizontally across the screen.
Adding Blocks and Sections

To add a section, click + Add Section on the left panel then choose the section type you want to add.
You may also add blocks underneath each section. Different sections will have different names for these blocks. For example, a Slideshow Banner section will have slides instead of blocks.

Click on + Add Block underneath each section, then choose the block type you wish to add.
Moving and Rearranging Blocks and Sections
You may need to rearrange blocks and sections to achieve your desired layout.

To do that, click on the icon on the left of each block or section tab on the left panel. Holding this icon will turn it into a six-dotted icon.
Drag the block or section up or down the panel.

Note that blocks can only be moved within their respective sections, and sections can only be moved within their respective groups (e.g., header, template, footer).
Removing Blocks and Sections
If you wish to remove a block or section, hover over its tab on the left panel.

An eye icon and a trash icon will appear.
Simply click on the trash icon to discard the block or section.
Note that removing a section will also delete the blocks contained within it.
After you’ve added and rearranged blocks, removing any unnecessary ones, you will already have your page layout. Be sure to do this to other pages as well. Refer to the “Pages” section of this guide for navigating and editing the other pages.
Editing Blocks and Sections
Editing blocks and sections is the heart of customizing the Shopify website.

Clicking on any block or section tab on the left panel will display the corresponding customization options on the right panel.
Depending on the selected block or section, you may edit text, add media, change where buttons direct visitors, and alter the selected section’s color scheme, among other things.
Copy

To edit your copy, you must add blocks or sections that allow you to add and edit text.
These sections would be conveniently named something like “image collage with text” or “video with text.”

You may also check the section preview to see if the section you’ll be adding has text to it.
Once you add the section, click on the text block beneath it (if it has one). These are identifiable with a text or paragraph icon. If the section doesn’t have a text block, check if you can add one by clicking + Add Block.

After you’ve selected the text block, edit its text on the right panel.
The Shine Shopify theme lets you change headings’ header types as well.
Brand Assets and Images
You may add your images to any section with a placeholder image.

Simply click on the section on the left panel, then on the right panel, click on the Select Image box and add your desired image.
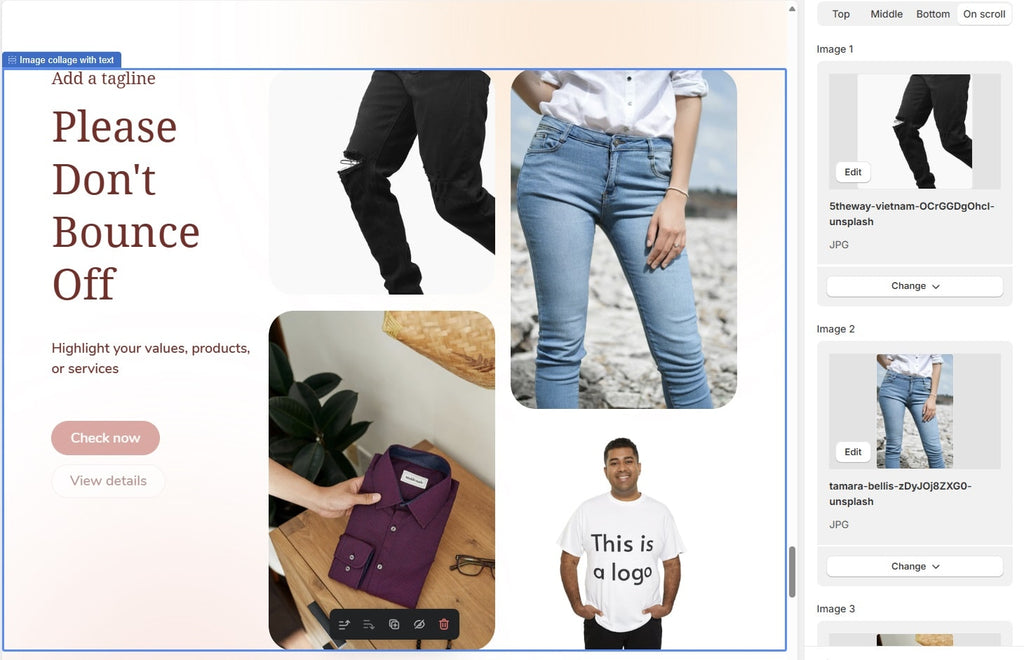
Depending on the section or theme, you may need to click a block underneath the section to edit the image. The block may be named something like “Image.”
Do this for every image and video you need to add to the page.
Style
Style refers to the typography, colors, and shapes of your site.
But in this guide, we’ll focus on editing your site’s typography and colors since those are relatively easier to customize but make up a significantly perceivable outcome.
Note that the step-by-step process for editing the typography and colors will differ across themes.
Typography

Click Shopify theme settings on the left. This is shown as a gear icon.

Then click on the Typography dropdown.

The settings that appear will look different depending on the theme you’re using.
For the Shine theme, you may edit the paragraph font and heading font separately. Merchants can even adjust the “prominent” and “default” fonts for headings, giving headers two different display fonts.
Tweak these settings as you please until you are happy with the outcome.
Colors
Just like typography, different themes also have different color customization options.
But normally, merchants can adjust the website’s color using color schemes. This will be the focus of this section.
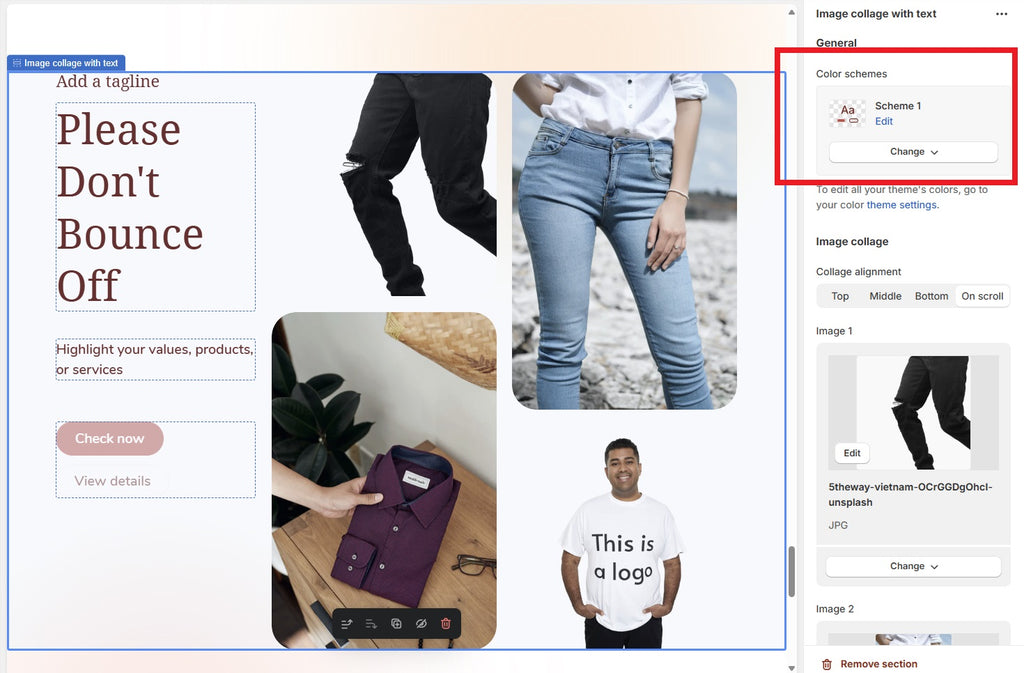
Whenever you click on a section from the “Sections” section of the Shopify theme editor, you can change its color scheme to one of the preset color schemes. These color schemes are aptly named Scheme 1, Scheme 2, Scheme 3, …, Scheme 99, and so on.
While in the “Sections” section, you may assign color schemes to sections as you see fit.
If you’re in the “Theme Settings” section, you can add and edit schemes to add to your palette.

To edit a color scheme, from the theme settings section (gear icon), click the Colors dropdown.

Select an existing color scheme and edit the colors. It’s a good idea to preview your changes by editing a color scheme already in use.

To add a new color scheme, click + Add Scheme and add the colors you want.
Conclusion
Great! At this point, you're equipped with the necessary Shopify customization know-how.
But it’s just as important that you familiarize yourself with select Shopify themes. This guide may offer a general and comprehensive approach to customizing a Shopify website, but it’s ultimately theme mastery that will skyrocket your website customization.


