Shopify is an excellent website builder and ecommerce platform for online stores. It gives users tremendous stylistic and functional flexibility when designing a website on Shopify.
This guide will go through how businesses can approach website design on Shopify, and publish their own site using the platform. We’ll also tackle some crucial Shopify design tips, which can be beneficial if your sales channels rely on an ecommerce store.
Introduction to Shopify Website Design
You’ll need to have a few items on paper before building out your website and Shopify store. These include a brand guideline, the value proposition, the copy, and the website wireframe.
Have a Solid Brand Guideline

Source: Venngage
A brand guideline is a set of rules on how the brand should present itself. Essentially, it’s somewhat of a Bible that preserves brand identity.
They determine collaterals’ tone of voice, colors and shapes, and what brand values to convey, among other things.
If your brand has a solid and specific brand guideline, you and your website builders will have no trouble creating a Shopify website that properly reflects the brand and its values.
Doing so will improve customer retention and brand affinity.
Decide on your Value Proposition

Source: Green Paper Products
Your value proposition is what sets you apart from other companies providing the same service as you.
Determining your value proposition and abiding by it will help you establish your market position better.
Having a value proposition will help you create more convincing copy.
Also, you can include product comparison sections that will help site visitors fully grasp what you bring to the table.
You may take it a step further and level up your About Us and Brand Story too.
Have Copy Ready
Shopify web designers and developers aren’t necessarily the best at creating engaging and converting copy.
Copywriters should create copy for the Shopify site so that developers can simply copy and paste it onto their respective text areas.
Ideally, copy would need to be reviewed and discussed through marketing meetings to ensure that they’re conveying the message in the best way possible.
Once copy is ready, you may begin drafting up how the website will look—including where the copy will be placed.
Create a Website Wireframe

Source: Uizard
A website wireframe is a rough draft of the website before it's developed.
Think of it like the storyboard for a movie or the guidelines for a detailed drawing.
The wireframe determines how copy and media are laid out throughout the website. It also shows what each section of the site is, ensuring that everything the brand wants to place on the Shopify store is accounted for in the website design on Shopify.
Ideally, marketing and upper management should give their approval on the website wireframe.
How to Design a Shopify Website?

Source: Tentree
Once you have your website draft, you may begin creating its live version with Shopify.
Note: This guide will tackle the design aspect of creating an ecommerce store and a Shopify website. We won't dive deep into setting up payment gateways, adding products, managing inventory, and adding a custom domain, since these are more oriented toward building a complete ecommerce business.
Instead, we'll focus on Shopify web design.
At the end of this guide, you'll learn how to design a Shopify store that engages your target audience and potentially converts prospective customers.
Here’s a step-by-step guide to creating a stunning website.
But first, find your Shopify design ideas and inspiration with the best Shopify store examples!
Step#1 Choosing the Right Theme for Website Design on Shopify

Shopify themes are templates that provide the stylistics and functionality necessary for website design on Shopify and building a Shopify store.
There are loads of themes to choose from, some paid, while others are free.
Free themes can be great for starting online businesses, considering they cost nothing at all. But for heightened functionality and additional features, some stores may consider the investment in paid themes to be worth the returns.
Some themes are also optimized for certain business categories, such as wholesale, tech, cosmetics, apparel, and food, among others.

For example, our SalesHunterTheme, Electro, has a product comparison section to compare specs; ideal for tech retailers.

Our beauty-focused theme, Shine, has a draggable before-after section; ideal for cosmetic ecommerce websites.
Different themes will also have varying amounts of customization options, with higher-priced themes typically having more of them.
However, all Shopify themes will have a responsive design. This means they'll effortlessly look streamlined on both desktop and mobile devices. Tablets and laptops too.
To choose a theme, go to the Shopify Theme Store.

From the Shopify Admin Panel, go to Online Store - Themes.

Then click Add Theme - Visit Theme Store.

Once you’re in, click Explore to see all the themes they have available.

Choose the Shopify theme closest to your website draft. This will minimize the amount of changes you’ll need to make later on.
Note: The images found on the themes’ previews are just for the sake of preview. You may change the photos with those of your own.

To get a better feel for a theme, click Try Theme. You may even do these with paid themes. You only have to pay if you decide to publish it.
Clicking on TryTheme will save the theme to the Shopify theme library, where you may explore and customize Shopify website as you please.
> Find the best 2.0 Shopify themes 2025, read careful review to choose the best option for your store!
Read details about
Step#2 Go to the Theme Editor
The theme editor is where the magic happens.
Here, you’ll be able to customize your chosen theme and really make it your own.

Go to Online Store - Themes.

In the Theme Library, click Customize next to the theme you want to edit.

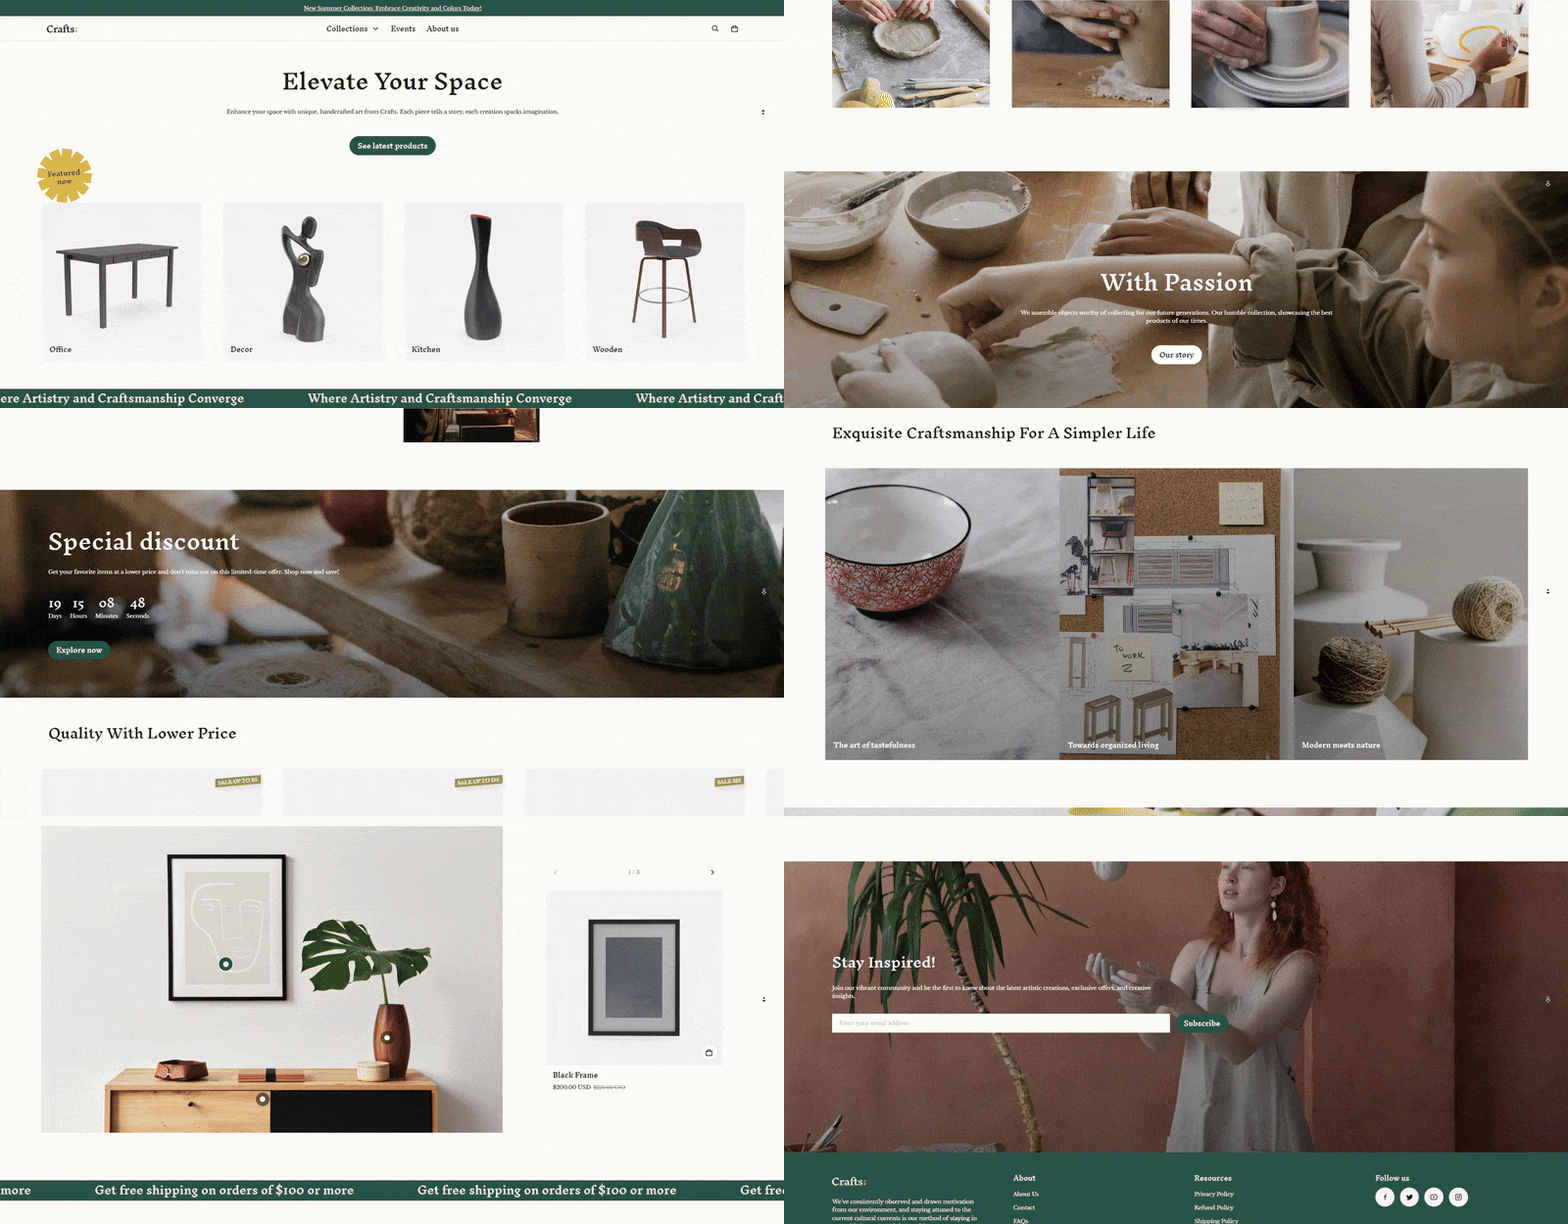
Source: Blum theme
This will take you to the theme editor.
Now, there’s a lot to cover when it comes to the theme editor that we won’t have time to discuss in this guide.
So, we’ll discuss the basics — adding blocks and sections and including your brand assets in your website layout.
Adding Blocks and Sections to your Shopify Website

On the left panel, you’ll see what’s called “Sections” and “Blocks.”
Sections make up a page.
Blocks make up a Section.

You can get started by clicking the + Add section button.
Note: Make sure the + Add Section button you're clicking is underneath the "Template" group, not the "Header" or "Footer" group. When you click + Add Section, Shopify will add a section for that particular group.

Depending on the theme you’ve chosen, you’ll see around 16 to 20+ sections to choose from. You’ll also see a preview of what each these sections look like and what they do.
Choose the section you want to add.
Click the + Add section button on the left again if you wish to add more sections.

Underneath each section are blocks. (They may be called different things depending on the section.)
Click + Add block under each section to add a new block.
The block types you can add will depend on the Section. Blocks usually come in the form of image slots, text slots, video slots, and buttons.

Once you’ve added the blocks and sections you wish to add, you may rearrange them by dragging them up or down from the left panel.
You may also delete sections and blocks by clicking the trashcan icon near them.
Or, hide the sections by clicking the eye icon.
Adding Images and Text to your Shopify Website
Once you have a layout you’re happy with, you may begin adding text and images.

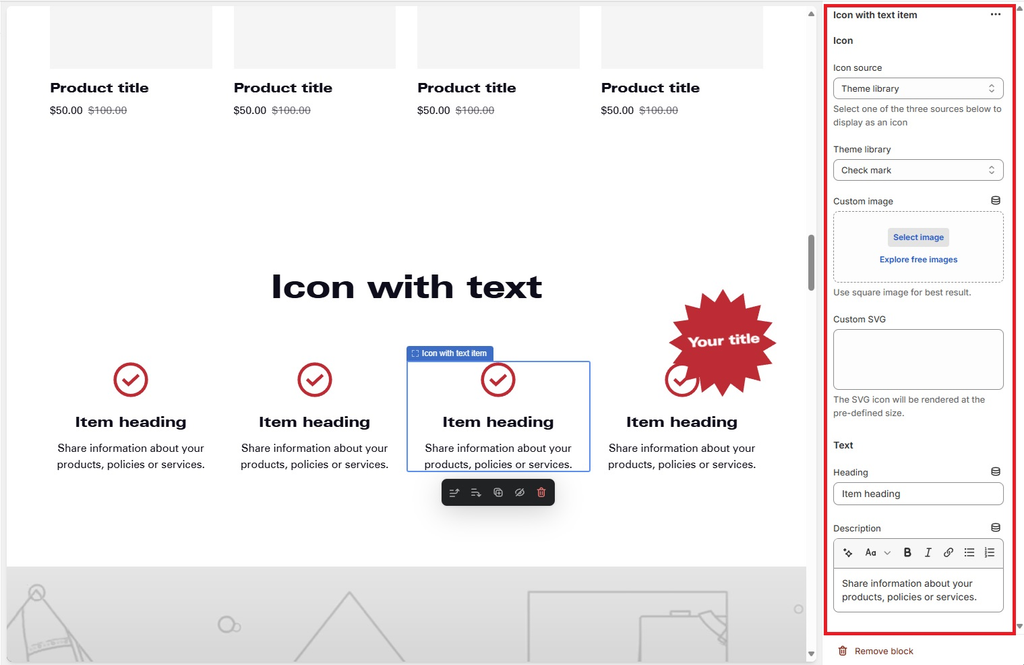
To do that, click on a block or section. Their corresponding customization settings will be found on the right panel.
For sections, some of the settings you may change include the section color, heading, and padding. The customizability of a section will depend on the section you’re editing and the theme you’re using.

Blocks may be edited in the same way—except they’re more limited with the options.
Typical edits made to blocks are the copy, images, and button labels.
This is where you’ll get to add your brand’s media assets and convincing copy.
Notice that when you click certain blocks, the panel on the right will give you the option to add images and/or copy.

After you add images and text, your website will look a little more complete.
Step#3 Shopify Website Customization with Apps
Apps can provide third-party customizability and features that wouldn’t otherwise be possible with your chosen theme or the Shopify theme editor, making them a valuable tool for Shopify website customization.

One such example of a useful Shopify app is the Judge.me testimonial app.
The app allows merchants to place customer testimonials on their website, enhancing credibility and contributing to Shopify website customization.

There are also upsell and cross-sell apps that allow merchants to display a cart progress bar to customers, prompting them to add more items to their cart in exchange for a reward (e.g., free shipping, discount coupon).
You may find some helpful Shopify apps in the Shopify app store.
Just like themes, there are free apps and there are paid apps.
But there are a lot of apps with both free and paid plans. So, you may try out their free version and then upgrade to a paid version when you decide to scale.
Also, each app will have different instructions on how to integrate them onto your website. So, be sure to follow the apps’ instructions carefully.
Step#4 Add More Pages

When you’ve just started using Shopify, the only menu items you’ll see on your webpage are the homepage, catalog page, and contact us page.
Depending on your business, you may want to add a Careers page, an “About Us” page, and a blog page, among other things.

To add pages, go to Online Store - Pages.

Click Add Page, then in the screen that follows, give it a title, some content, and edit its SEO. You may leave the content portion blank if you wish.
Click Save.
Step#5 Add Additional Navigation

Now, go to Online Store - Navigation.

Click on the menu you want to edit. In this case, let’s edit the menu that’s already on the Shopify website—the main menu.

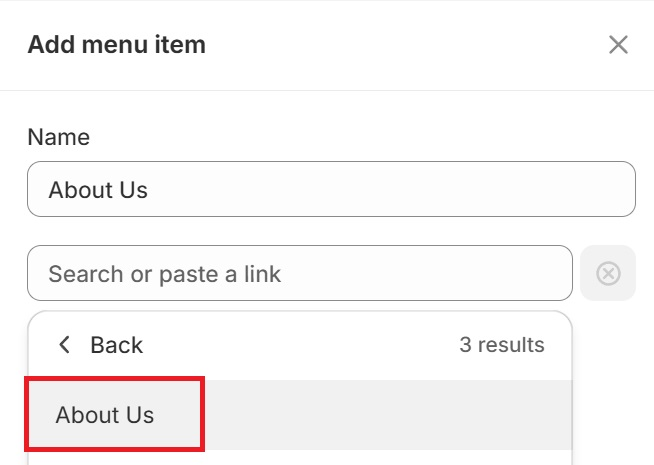
Click on + Add menu item.

Fill in the name, then click the “search or paste a link” field.
Select Pages from the dropdown and choose the page you created earlier.
Click Save.

The new menu should be updated. This will reflect on the theme editor.
You may go back to the theme editor wherein you may edit the new page(s) you’ve just created. Populate them with their own sections and content.
Keep doing this until you’ve created all the necessary additional pages for your Shopify website. At this point, you’d already have the final version ready for publishing.
Step#6 Get Approval
Once you've created the Shopify store, the team will want to see it and give their comments and insights before it goes live.
You’d want the team to experience navigating the site for themselves, instead of just presenting images and screenshots of the Shopify website.
However, you also wouldn’t want the site to be accessible to the public just yet, since you have yet to gather insights from the team.
So, password-protect your Shopify store for now.

To do that, go to Online Store - Preferences.

Scroll down to the Restrict store access section.
Tick on “Restrict access to visitors with the password” and set a password.
Click Save.

This should place a password on your newly created Shopify store. Give the password and Shopify store URL to the team needing access.
Once you get approval from the team and other key personnel, you may remove your online store’s password, opening your Shopify website to an anticipated public.
Shopify Website Designing Tips
There are some crucial tips to consider for Shopify web design.
Proper Use of Headers

You’ll overwhelm and lose visitors if your value proposition, brand story, About Us, product descriptions, etc. are blasted onto customers' faces with chunks of paragraphs.
Instead, use headers.
Headers are the main and most important on-screen text. They capture initial interest, leading site visitors to read the body text.
Using headers also balances the site's visual elements, ensuring that the copy doesn’t weigh on the eyes.
Make Copy Short and Sweet
Short and sweet copy leaves a more lasting impact and impression.
As opposed to text that reads like it’s trying to reach a 10,000-word limit.
For example, instead of saying “We use ingredients that are high in quality for your consumption,” simply say, “We use high-quality ingredients…”
By writing more succinctly, you can add more thoughts and ideas without making the overall copy boring to read.
Add Photos and Videos
A Shopify site must be visual and appealing, or else it will look like an office document—which won’t be very engaging.

Add a slideshow, a captivating image, a video, or a moving photo to the website’s hero banner.
Add photos and videos for each of your products.
For each of your products’ value propositions and highlights, have an image that best represents the corresponding highlight.
The Shopify site’s visual element will draw site visitors in, improving linger time and conversion. It will also improve the user experience since it allows visitors to see rather than imagine.
Understand Basic Color Theory
Color theory is a universal guideline for which colors look good together. This is used in many different design aspects—interior, architecture, art, and even web design.
We don’t have time to discuss color theory in depth. But a practical rule you’ll need to remember is that you can’t go wrong with these two schemes:

Complementary. This color scheme utilizes two opposing colors on the color wheel, providing a harmonious and pleasing visual result.

Analogous. This color scheme uses adjacent colors on the color wheel, providing a clean and uniform appearance for your Shopify site.
Color theory will help your team consistently create eye-catching Shopify landing pages and collaterals.
But remember, the brand guideline takes precedence. Make sure the color schemes you come up with are in line with the brand's identity.
Advanced Shopify Design Tips
Speed Optimization Techniques: Discuss the importance of fast load times, particularly for mobile users. Mention tools like Google PageSpeed Insights for testing site speed. Provide actionable steps such as optimizing images, using a Content Delivery Network (CDN), and minimizing JavaScript and CSS files.
Conversion Rate Optimization (CRO): Introduce CRO concepts such as A/B testing, using heatmaps to understand user behavior, and optimizing call-to-action (CTA) buttons. Provide examples of effective CRO strategies that have boosted conversions for Shopify stores.
Common Mistakes to Avoid in Shopify Design
Highlight common pitfalls like overloading the store with too many apps, ignoring mobile optimization, and not prioritizing SEO. Offer solutions and best practices to avoid these mistakes.
FAQs
What are the first steps in designing a Shopify website?
To begin designing a Shopify website, choose a theme that aligns with your brand. Customize it to reflect your identity, and set up essential apps for functionality.
How can I ensure my Shopify website is mobile-friendly?
Ensure mobile-friendliness by selecting a responsive theme and testing the site on various devices. Use Shopify’s built-in tools for mobile optimization.
What apps are essential for a Shopify website?
Essential apps include those for enhancing user experience, improving SEO, and boosting sales. Examples include apps for email marketing, reviews, and abandoned cart recovery.
What are common mistakes to avoid in Shopify design?
Avoid overloading with apps, neglecting mobile optimization, and ignoring SEO. Focus on a clean, fast, and user-friendly design.
How can I optimize my Shopify site for better conversions?
Use Conversion Rate Optimization (CRO) techniques like A/B testing, optimizing CTAs, and analyzing user behavior to improve site conversions.
Conclusion
A proper Shopify website design can make the difference between a developed Shopify store and an unreadable office document.
It's a must for Shopify websites and ecommerce stores to have an engaging and appealing layout. This means functional design elements and a cohesive, streamlined, and on-brand look.


